Table of Contents
How to Change a Harp String
For harpists learning to replace broken strings, snagged or snapped strings can be a problem. But once you’ve mastered the art of stringing a harp, you can fix them quickly.
However, when a harp player is just starting out, it can be tricky to learn how to avoid breaking strings. All the strings wear out eventually and there isn’t much a harp player can do about it.
Old string drops lose their flexibility and become vulnerable to pressure, so even if you protect your instrument by storing it in perfect conditions and never playing it, you’ll eventually need to change its strings.

Replacing Your Harp Strings
The following procedure is a proven way of stringing a harp. It is simple and quick and will ensure a quality installation.
Step One – Prepare the Right Length of String
First, ensure that the replacement string you’ve got is long enough to match the broken string.
Sometimes, harp string is sold in lengths of 4 feet and this is enough to replace a treble or mid-range string twice and even 3 times.
If you have to replace one of the lower bass end strings, however, you would possibly only get one replacement out of it.
The replacement string has to be long enough to stretch from the eyelet to the tuning pin.
There must also be enough ‘spare’ string left to reach the tuning pin and tie a knot to keep the whole thing tight and secure.
Step Two – Tie the Knot (this can be tricky!)
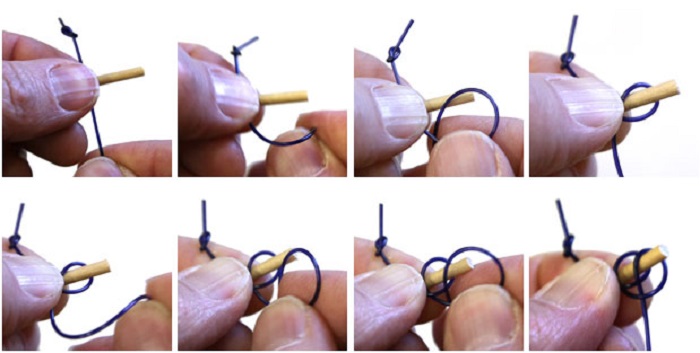
Begin by threading your harp’s replacement string through the hole on the soundboard. It should go in through the soundboard and be pulled right out through the back. The easiest way to securely tie a harp string is with a bowline knot. When you’re unsure how to do that, we suggest you watch a video with a clear example.
We’ll try to explain the bowline technique but it’s simpler to be taught in case you can see it happening in front of you.
Lay the string throughout your hand with the loose end hanging off your palm.
Fashion a small loop in the line. Bring the loose end upwards and pass it through the loop’s eye (generally often known as ‘rabbit coming out of a hole’) from the underside.
Now, wrap the string around the standing line and back down through the loop (generally known as ‘around the tree and down the hole’).
Hold the standing line and pull on the string’s free end to tighten the bowline.
You’ll want a spare piece of string (use an intact piece of the broken string so long as it’s strong enough) to create an ‘anchor’ for hitching the bowline around the tuning pin.

Step Three – Hitch the String to the Pin
As soon as your bowline is tight enough, thread the string back through the harp’s soundboard. You’ll know the knot is holding in case you can feel it tugging at the back. Now, thread the string past the semitone lever. The lever needs to be open as you do this. Pull it past the bridge pin and right up to the corresponding tuning pin.
You’ll discover the next part easier if the holes in the tuning pins are already facing downwards. It’s going to allow you to pull the string through the holes without meeting any obstructions.
Maintain threading the string through the hole till it feels taut. While maintaining this tautness, measure around 1 ½ inches (two fingers width) of string above the top of the pin.
Anything above this point you’ll be able to snip off with scissors or wire cutters.
Step Four – Wind the String Around the Pin
Pull the string back down through the tuning pin till there’s around ¼ inch left sticking out above the pin and the line feels much less taut.
Stand behind the harp and use your tuning key to turn the tuning pin away from you. This can slowly twist the brand-new string around the pin.
The pitch of the string will increase because it coils and turns.
That’s it!
All you need to do now is tune your harp.
Sylvia Woods, a respected harpist, has a detailed video on stringing a harp.
How Long Do Harp Strings Last?
This can be a tough question as a result it will depend on so many different variables with improper storage being probably the most common reason for breakages.
The lifespan of a harp string is affected by how roughly you play it, how often you play it, the way you store it when not in use, the overall quality of the instrument and strings, and the way well you applied the string to the harp in the first place.
All of those factors have an effect on how long you can use a harp string before it snaps.
Nevertheless, it’s additionally important to realize harp strings will wear even without your intervention.
Most musicians and string makers agree nylon harp strings have a shelf life of around 5 years if they’re not being played. Authentic gut strings are more delicate and last roughly a year.
Finally, playing a harp string puts quite a lot of stress on it (if it didn’t, you wouldn’t have the ability to produce such beautiful sounds).
In case you’re playing with any regularity, expect strings to break before they get anywhere near 5 years old.
In case you’re lucky and your harp strings stay intact all year, it’s still a good suggestion to replace them.
As a common rule, frequent players should think about changing the old strings (even when they’re not damaged) with new ones once every twelve months.
The top two octaves might require more attention; harpists who play constantly tend to change these twice per year.
How Much Do Harp Strings Normally Cost?
Harp strings don’t come low-cost as a result they must be of fine quality to withstand that vigorous plucking.
On average, a full gut string set (from 00G to 5th Octave A) will cost you roughly $400. Individual gut octave strings vary from $6 to $30 depending on which octave string you have to buy.
You normally have an option for purchasing strings with or without wires. In case you get them with wires they’re significantly costlier.
Conclusion
It’s possible for strings to break a day after they’ve been placed on or to survive for a decade or more. One lucky thing is that harp strings rarely have to be changed. Harp strings usually are not like violin or guitar strings and they don’t go “useless” in the same way.
Monofilament nylon strings only have to be changed if they break, nylon/nylon string about every two years or so (in case you play regularly), and wire string changing yearly (once more, in case you play regularly.) Additionally, not like a guitar or some other stringed instrument, we strongly suggest against ever-changing all of the strings on a lever harp at the same time.
Finally, you now know the right way to successfully replace and change the string on your harp. Depending on how many harp strings you’ve got can decide how much money and time you need to keep putting into your harp so be prepared.
We hope you discovered some more necessary details about them as well.
Keep in mind to always care about your strings and try to preserve them as long as possible.


